 almost completely thicknessed maple sides, a bookmatch of maple for a back, a bookmatched spruce top, and a five piece laminated maple and mahogany neck.
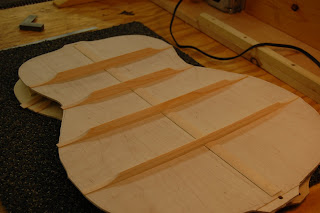
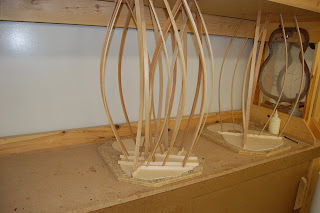
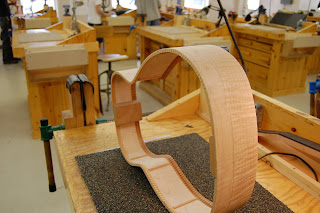
The class was divided into halves, and my half would be working on necks first while the south half would be working on their body. To the right here from the bottom up is the back, the top and the sides.
The neck blank is cut from a a block in such a way that you can get two necks out of it. I have always made my guitars from one straight plank of 3/4" stock which requires a scarf joint to produce the 15 degree angle for the neck/head stock transition. These necks however are solid minus the laminations, so the neck angle is cut into the blank. Above you can see my neck blank just as it came off the band saw. The neck is cut way over-size and is later brought down to final thickness with an oscillating spindle sander and a guide fence. The sander wasn't quite square though, and the fence was tipped the opposite direction so the taper sanded into the pieces was compounded. Fortunately, I don't think it'll show in the end product.

Here is the latest friend I've made, a walking stick. We were great friends for a long time but eventually something happened and no matter what I did, she just ran faster and further from me. But you know what they say, "if you love somebody, you have to let them go". So she's gone now and I haven't talked to her in over a week.

I miss that little walking stick like crazy and all the wonderful things we shared... I've been plugging away at my work though, just focusing on other things and my days seem to be going a little faster. I love building guitars for sure, and I must say my guitar is coming along nicely.
After bringing the profile down to final dimensions on the neck, I put on the ebony peg head overlay and installed the mother of pearl inlay that sits in the peg head. Here is a picture of the inlay and overlay mostly completed. The inlay has two pieces of black perfling that sit between the top and bottom half of the top piece of pearl. Just before the guitar is finished, there will be some scribing and filling done on all of the inlay that adds a final touch to it. You'll just have to wait to see that cause I'm not going to try to describe it.
 Unlike my other guitars, I did in fact cut this pearl out with a jeweler's saw myself. It's not so bad actually. As you can see, we also have cut the holes for the tuning machines.
The fingerboard is also cut and glued in place with its own radius on the playing surface, but I will not install frets until just before finishing. I do not have a direct picture of the fingerboard, but you can see the tongue of it sticking out in the picture of the neck tenon.
The tenons here are cut on a router jig which works quite nicely. I've always cut mine on a table saw, but I can see that I could speed things up with a router jig.

These necks are bolted onto the body, so if you look on the center of the tenon you can see the two threaded inserts that will accept the neck bolts later on from the neck block.
After the neck reached this point, the sides of the room switched tasks, and we began working on the body while the other side started work on their necks. The first day working on the body consisted of rough shaping the sides to match their final radius, and also joining the book matched pieces.
After the pieces are joined, we began marking out for our bracing pattern, and inlaying the rosette on the face of the soundboard.

Here is a rather poor picture of my soundboard with the soundhole cut out and the rosette installed. These rosettes are inlaid with five pieces of perfling and then sanded flush. We used a fly cutter on a drill press to cut the rosette slot, and apparently I plunged through too fast which caused some grain tearout, but it's not too bad. I went slower on cutting out the soundhole, so that came out very clean and looks great, and actually with a giant hole in the middle of the rosette, the tearout is even less noticeable. I have since sanded the edges of the soundhole as well.

Here is my soundboard with all of my braces installed and shaped. The dark piece of wood is called the bridge patch which is a cross-grained piece of hardwood intended to give better support to resist the pulling of the string tension and also to keep the string ball ends from pulling past the bridge pins through the soft spruce. The pyramid shape of the braces was actually formed on a belt sander, but the tapers and scalloped ends were cut with a chisel after the braces were glued to the board.

Here you can see my back plate with the finished braces installed and shaped. The braces on the back are fit tightly into what's called the back graft. The back graft is just a strip of cross grained spruce along the center of the plate which strengthens the back center seam, making it far less likely to ever split from shock or humidity changes. All of the braces on the back, and many of the braces on the front plate will be "tucked" into pockets cut on the side linings. So extra strength is added there helping prevent the brace ends from ever popping loose.

Here is a picture of the method we use for gluing on braces. The plate sits under a cupboard bottom, resting in a dish that has a radius matching the radius cut on the bottom of each brace. (60" radius for tops, 20" for backs) These sticks that guitar makers like to call go sticks, are then wedged in between the tops of each glued brace and the bottom of the cupboard. Each stick applies a considerable amount of force and glues the braces down very well. The only problems are that you have to organize the sticks in such a way that they balance each other and do not push the lubed up brace around on the plate too much before the glue starts to grab, and you also have to sand out dents that are left by the sticks.
 Here is a picture that shows from a distance my sides all bent, with the head and tailblock installed. The kerfed linings have also been installed, along with the small side braces that they like to do here. Before and after the kerfing is installed, the sides are sanded as a whole on a radiused dish to achieve the final dome that each side of the guitar will have once completed. The sanding dishes have a radius that corresponds with that of the braces on the plates. As you can see, my sides have some pretty decent flame in the wood, and while I know my back doesn't look this good, it should brighten up pretty nice when it's all done as well.
Here is a closer view of a section of the kerfing butted up against the edge of the neckblock.
Well I guess that's it for guitar camp news this week. Hope you'll are doing well.
Thanks Grandpa and Grandma for the care package and the letter.
Thanks Mom for the THREE page hand-written letter as well. Very thoughtful.
Looks like an awful lot of fun. You are making good progress, and seem to be learning a lot, too.
ReplyDeleteIt seems to me that your braces are pretty tall, yet-- will they be trimmed more, later?
That rosette looks very clean, to me, though I realize that lighting, etc., can make things show up differently. I'm anxious to see and play the final product.
I have several violas and a couple of violins to work on after surgery, so in April, we should have enough for a couple of tables at the show.
Looking forward to having you home. Don't worry about the walking stick. Just be glad it wasn't a scorpion... :-)
Brian and Stephanie's Dad
We are proud of you and are very happy to know that you love what you are doing. It is great to be able to see the pictures with your latest work. Keep up the great work, learn a lot and have fun doing it.
ReplyDeleteLots of love,
Your Aunt and Uncle.
Hey Bri! I tried to call, but I guess you don't have good reception at home. We should plan a Skype date. Did you get to go paddling this weekend? Your new guitar is looking lovely, and it sounds like you're learning a lot already Looking forward to planning our European adventure!! :) Woohoo!
ReplyDeleteHa! I just figured out I could change the name on my sign-in!
ReplyDeleteLotsa note-taking, Brian! And lotsa pictures! This is a once-in-a-lifetime opportunity.
Dad