
This week we have been working on making fingerboards, necks and bridges for our classical guitars.
Here is a shot of the ebony fingerboard after the slots have been cut for the frets. In this picture, the fingerboard bindings, which are also ebony are glued on and being held in place with masking tape while the glue dries. You must be sure to clean out any excess glue from the fret slots before it dries. Any remaining glue could prevent the frets from seating properly.

The necks we build here are all made from five pieces of wood. This saves a bit of money on materials as you don't need stock as large, but it can also make for a really nice look with the maple stringers between the mahogany pieces. I didn't take a picture of the gluing process, but it involves drilling through the entire stack of wood at two points and then using dowel rods in those holes to keep the stack from sliding around while clamping it up with glue. Each laminated slab will produce two neck blanks

This is a picture of the drilling jig we use for the tuning machines on the classical guitar. It's really a pretty cool idea; Since there is apparently a standard tuning machine spacing these days for classical guitars, this jig has different bushings to match the hole needed for the tuning peg, which there are a couple different sizes of. Also while the drilling guide holes always stay in a line, the parallel plates on each side will hinge to fit any peghead thickness. A clamp is a good idea while drilling so that your jig doesn't move. Also after the middle hole has been drilled, we put a dowel rod through the jig, into that hole so that there is no chance of the jig moving for the subsequent holes.

On the classical guitars, the tongue of the fingerboard is not glued to the face of the guitar, and therefore must be supported by other means since it has no real strength of its own. So after the neck blank has been made, the easiest way to do this is to add an extension. You can see that the extension starts right where the truss rod slot ends. It is of course a butt joint, and is rather impossible to hide. I have a couple other ideas as to how you could possibly solve the problem with less visible results. For one, don't use super glue like they have us do here because superglue will always make a black line no matter how tight the wood fit together beforehand. One other idea would be to have a stacked heal which is very common, and then the extension could actually just be the same piece of wood that the main neck shaft is made from thus eliminating the butt joint.
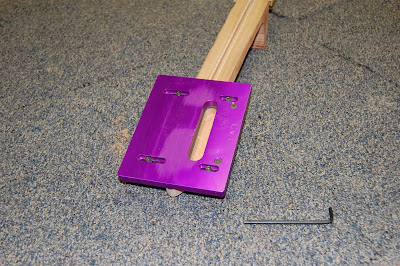
This is the router jig we use for cutting the slots in the classical style peghead. I call it the Barney jig since it's a little bit purple, like the dinosaur. It's actually anodized aluminum, and I'm sure quite expensive. I think I'll be making mine. The jig registers off of the tuner holes that have already been drilled through the sides of the peghead, and then has clamps on the backside to hold it in place.
So now the peghead slots have been cut, and also on the back side of the slots, the edges have been pulled back almost 3/4 of an inch to a gentle point. I kinda skipped over it, but you can see the peghead overlays have been glued on. There is one layer of ebony over a layer of maple making up the overlay. Towards the top of the peghead, a decorative "notch" has been cut on each side. You have to really take your time with everything at this stage because the large surfaces will show how square, true, and symmetrical your work really is.

Here's a look at one of my tuning machines in place. They fit, perfect, of course. I'm not a huge fan of the tuners we got, but I guess they do the job. They're not particularly ugly, there's just something about that's screaming 35 dollars, rather than the minimum of 75 I'd say should be spent on good classical tuners. I could always change them out later if I wanted.
Here's a few pictures of the bridge I carved today. There are several styles of classical bridges, as there are with any other guitar. However, almost always, classical guitar strings feed through holes in the back of the bridge and are tied rather than having a ball end that sits on a plate underneath the soundboard as a steel string guitar usually has. You can see the small holes in the back of the bridge here. The slot on the other side of the bridge is where the bone saddle will go eventually.

Like the baritone bridge, this one is also made from ebony. The classical bridge however has much more material to be removed from the blank, and therefore took much longer to make than the other one did. Ebony does not carve particularly fast, or easy. However, it does make a beautiful finished product. I'm not quite finished with this bridge. I still have some finish sanding to do, and some general truing up of some of the contours.
 This week we have been working on making fingerboards, necks and bridges for our classical guitars.


 Like the baritone bridge, this one is also made from ebony. The classical bridge however has much more material to be removed from the blank, and therefore took much longer to make than the other one did. Ebony does not carve particularly fast, or easy. However, it does make a beautiful finished product. I'm not quite finished with this bridge. I still have some finish sanding to do, and some general truing up of some of the contours.
 The bevels you can see on the edge of the bridge in this picture are my main concern for finishing up this bridge. They should be uniform all the way across the edge, and ideally, all of the edges should have the same amount of angle exposed. There are also a few sanding scratches I need to go back and remove. I have polished the bridge to this point with 0000 steel wool and lemon oil. That is how the final polish will be done too, but shining it up at this stage helps to see what parts still need attention.
That bridge looks like a pretty exacting job. So does the headstock. I had never really noticed how completely different a classical bridge is from a steel-string guitar.
ReplyDeleteHave you begun your technical drawing, yet? That is going to be another demanding job.
I'm surely looking forward to seeing these instruments and playing them. (Soon...) :-)
Dad
Helllooooo little bruthah! One month and 3 days till I see you! can't wait. love you.
ReplyDelete