Saturday, September 26, 2009

Acoustic Guitar Beginnings

So with the close of the electric bass project, it's time to tear into the first acoustic guitar. We received all of our wood materials on the first day which consisted of almost completely thicknessed maple sides, a bookmatch of maple for a back, a bookmatched spruce top, and a five piece laminated maple and mahogany neck.

The class was divided into halves, and my half would be working on necks first while the south half would be working on their body. To the right here from the bottom up is the back, the top and the sides.


The neck blank is cut from a a block in such a way that you can get two necks out of it. I have always made my guitars from one straight plank of 3/4" stock which requires a scarf joint to produce the 15 degree angle for the neck/head stock transition. These necks however are solid minus the laminations, so the neck angle is cut into the blank. Above you can see my neck blank just as it came off the band saw. The neck is cut way over-size and is later brought down to final thickness with an oscillating spindle sander and a guide fence. The sander wasn't quite square though, and the fence was tipped the opposite direction so the taper sanded into the pieces was compounded. Fortunately, I don't think it'll show in the end product.


Here is the latest friend I've made, a walking stick. We were great friends for a long time but eventually something happened and no matter what I did, she just ran faster and further from me. But you know what they say, "if you love somebody, you have to let them go". So she's gone now and I haven't talked to her in over a week.


I miss that little walking stick like crazy and all the wonderful things we shared... I've been plugging away at my work though, just focusing on other things and my days seem to be going a little faster. I love building guitars for sure, and I must say my guitar is coming along nicely.


After bringing the profile down to final dimensions on the neck, I put on the ebony peg head overlay and installed the mother of pearl inlay that sits in the peg head. Here is a picture of the inlay and overlay mostly completed. The inlay has two pieces of black perfling that sit between the top and bottom half of the top piece of pearl. Just before the guitar is finished, there will be some scribing and filling done on all of the inlay that adds a final touch to it. You'll just have to wait to see that cause I'm not going to try to describe it.
Unlike my other guitars, I did in fact cut this pearl out with a jeweler's saw myself. It's not so bad actually. As you can see, we also have cut the holes for the tuning machines.


The fingerboard is also cut and glued in place with its own radius on the playing surface, but I will not install frets until just before finishing. I do not have a direct picture of the fingerboard, but you can see the tongue of it sticking out in the picture of the neck tenon.


The tenons here are cut on a router jig which works quite nicely. I've always cut mine on a table saw, but I can see that I could speed things up with a router jig.


These necks are bolted onto the body, so if you look on the center of the tenon you can see the two threaded inserts that will accept the neck bolts later on from the neck block.

After the neck reached this point, the sides of the room switched tasks, and we began working on the body while the other side started work on their necks. The first day working on the body consisted of rough shaping the sides to match their final radius, and also joining the book matched pieces.

After the pieces are joined, we began marking out for our bracing pattern, and inlaying the rosette on the face of the soundboard.

Here is a rather poor picture of my soundboard with the soundhole cut out and the rosette installed. These rosettes are inlaid with five pieces of perfling and then sanded flush. We used a fly cutter on a drill press to cut the rosette slot, and apparently I plunged through too fast which caused some grain tearout, but it's not too bad. I went slower on cutting out the soundhole, so that came out very clean and looks great, and actually with a giant hole in the middle of the rosette, the tearout is even less noticeable. I have since sanded the edges of the soundhole as well.

Here is my soundboard with all of my braces installed and shaped. The dark piece of wood is called the bridge patch which is a cross-grained piece of hardwood intended to give better support to resist the pulling of the string tension and also to keep the string ball ends from pulling past the bridge pins through the soft spruce. The pyramid shape of the braces was actually formed on a belt sander, but the tapers and scalloped ends were cut with a chisel after the braces were glued to the board.
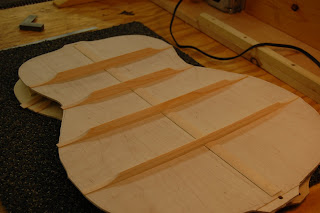


Here you can see my back plate with the finished braces installed and shaped. The braces on the back are fit tightly into what's called the back graft. The back graft is just a strip of cross grained spruce along the center of the plate which strengthens the back center seam, making it far less likely to ever split from shock or humidity changes. All of the braces on the back, and many of the braces on the front plate will be "tucked" into pockets cut on the side linings. So extra strength is added there helping prevent the brace ends from ever popping loose.
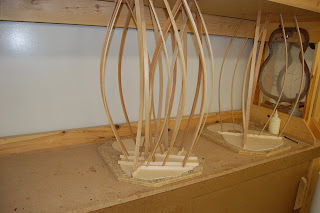
Here is a picture of the method we use for gluing on braces. The plate sits under a cupboard bottom, resting in a dish that has a radius matching the radius cut on the bottom of each brace. (60" radius for tops, 20" for backs) These sticks that guitar makers like to call go sticks, are then wedged in between the tops of each glued brace and the bottom of the cupboard. Each stick applies a considerable amount of force and glues the braces down very well. The only problems are that you have to organize the sticks in such a way that they balance each other and do not push the lubed up brace around on the plate too much before the glue starts to grab, and you also have to sand out dents that are left by the sticks.
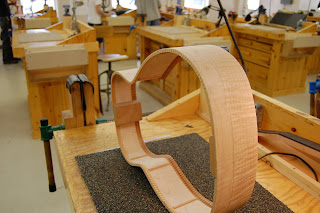

Here is a picture that shows from a distance my sides all bent, with the head and tailblock installed. The kerfed linings have also been installed, along with the small side braces that they like to do here. Before and after the kerfing is installed, the sides are sanded as a whole on a radiused dish to achieve the final dome that each side of the guitar will have once completed. The sanding dishes have a radius that corresponds with that of the braces on the plates. As you can see, my sides have some pretty decent flame in the wood, and while I know my back doesn't look this good, it should brighten up pretty nice when it's all done as well.


Here is a closer view of a section of the kerfing butted up against the edge of the neckblock.


Well I guess that's it for guitar camp news this week. Hope you'll are doing well.


Thanks Grandpa and Grandma for the care package and the letter.


Thanks Mom for the THREE page hand-written letter as well. Very thoughtful.

Saturday, September 19, 2009

Guitar Geek's Log Week 4

Hello everyone,
I'm sorry that I don't have pictures up this week from Guitar Camp. I haven't been feeling real well, and it seems building guitars was the most I could do... So no pictures were taken this week really. I did make a lot of progress on the neck of my second guitar though. I have made a radius on the fret board, cut the fret slots, and installed the fretboard bindings. I also cut out my neck blank, installed the truss rod, applied the peghead overlay, shaped the majority of the neck profile, and begun cutting the peghead inlay from gold mother of pearl. Hopefully I'll have more up for you soon. I do believe I got the highest grade in the class on our first guitar project so yay for me.

and now,

Hear that lonesome whippoorwill
He sounds too blue to fly
The midnight train is whining low
I'm so lonesome I could cry

I've never seen a night so long
When time goes crawling by
The moon just went behind a cloud
To hide its face and cry

Did you ever see a robin weep
When leaves began to die?
That means he's lost the will to live
I'm so lonesome I could cry

The silence of a falling star
Lights up a purple sky
And as I wonder where you are
I'm so lonesome I could cry

- Hank Williams

Sunday, September 13, 2009

Guitar Geeks Log Week 2


So this week at guitar camp we finished up all of our clear build coats of lacquer on the electric kits, and it was time to start wet sanding, and buffing.

As you can see in this picture, the final coats of lacquer will leave an "orange peel" texture. In order to achieve a smooth, mirror-like finish, this texture must be knocked flat with sandpaper. Wet sandpaper keeps the particles of lacquer from clogging, and here at the Galloup school, they even add a generous amount of dish soap with the water to aid in the cutting process. We begin with 800 grit, sanding until no shiny spots can be seen, then we smooth it up a bit with 1,000 grit. At this point, the finish has a dull, but level appearance looking something like this...


Once all of the wet sanding is complete, it's time to buff the guitars on the first of two buffing wheels. The wheels are a cotton linen fabric and are identical in composition, but one is used with a red coarse wax, and the other is used with a fine white wax.

I don't believe that I have any pictures of the guitar directly after it was buffed on the wheels. After the buffing wheels, the guitar goes through two stages of hand buffing. One is a very fine cutting polishing compound, and the other is a drying furniture polish witch I'd say doesn't really cut as much as it just puts a nice protective coating on the finish. One word of caution with the drying furniture polish: Don't let any over spray get onto the finish without immediately rubbing it in. If it dries on the polished guitar, it's back to the red buffing wheel to get the spots off. Actually, I guess that was 32 words of caution. Anywho... Here's the guitar after the furniture polish: I have to say it looks better in person.


At this point in the week, which really wasn't moving very fast, we were given a short lecture on wiring and soldering basics and then released to mess up our own projects. Mine however actually went really well.. As did most of the guitars really, some just weren't as pretty looking inside. I didn't take pictures of my finished wiring this week, but hopefully I'll get that up soon. Here is the control plate with all of the pots and the output jack mounted up.


So now the guitars are pretty well polished, and wired, it's time to start installing all of the hardware and putting the thing together. This is where I got a bit mad at the school this week.


All of the telecaster style guitars had cute little tuning machines that installed with no trouble at all... But the basses on the other hand, such as mine, have large gnarly tuners, with spots on them that must be recessed for the tuner to seat properly on the back of the peg head.
These spots look something like this..


The tuner to the right shows the parts that must be countersunk, and the tuner to the left shows what those little "feet" are from. They are what holds that worm-drive peg in place.


So the best time to countersink these would have been before there was ever any lacquer on the guitar. We weren't even given the tuners until after the finish was sprayed and done, so I had no idea about this issue ahead of time.

They wern't going to have us countersink them at all. So without making room in the wood for those feet, the tuner sits like this...


Not cool, huh? and when you blow this image up to actual size, that gap is a lot bigger. This is by no means how the tuners were meant to be installed, and I wasn't very happy that this is what they expected us to just be happy with. So I told them. But they just tried to brush it off as if there's more than one way to do things and that there was nothing wrong with this image. They normally do not allow students to change their guitars at all, but I guess since they knew it was not how these are meant to sit, and they could see I wasn't okay with it, they told me I could fix it if I wanted on my own. So I did, and I have the only bass of three that has the tuners installed properly. I understand that this part of the program is not the highlight, and that better practices are yet to come, but seriously? This is my headstock with one tuner laid in place, and the recessions I cut visible.


Much better right? I think so, but I guess you already knew that.


Anyway, I didn't mean to cause a big stink, but I couldn't let my guitar be "done" with such a silly problem as that.


My headstock with all of the tuners in place looks like this, though I don't have a picture of the back showing my superior installation. Sorry.


That's all I have for guitar progress this week.


In other news, my neighbors still go through a 30 pack of beer a day in the other guitar cabin. One of them took a pretty hilarious spill over a split rail fence the other day. He kept the beer upright, but still spilled a little when he hit the ground; better luck next time I suppose.


Some of the locals just across the street seem to have a bit of a drug operations going on. They get a lot of random cars coming to their house. They don't seem very friendly, nor does their dog who has already bit one of the guitar students from a past term. He looks like this, but a little more Satany:

There are a couple of girls that live there who seem friendly enough. The girls are probably in their twenties. They have two goats that they take for walks on a fairly regular basis; their names apparently are Chocolate and Milkshake. The goats seem friendlier than the dog; my friend Aaron from the school goes out to pet them as they walk by. They never walk far though, barely past our house and then they turn back home, making a round trip of 200 yards.
The other day I came home from the "phone booth", my car, to find all of the guys sitting in the cabin watching TV with each and every one holding a large kitchen knife. I finally asked what was up and they supplied me with the following story: While I was gone one of the girls came walking down the road towards our cabins. My friends were out playing football in the yard and by the road when she walked up with a clipboard and began to randomly ask questions about the J F Kennedy assassination. She had the story all mixed up, but didn't seem to care to much about it anyway. When the distant sound of a car could be heard coming down the road, she split mid sentence and took off down a trail that went into their property. It's a very dense trail of tall grass and brush and you don't have to go far into it before you can't be seen from the road. After the car passed, which turned out to be me, she came booking back out of the grass, and sprinted for her house without saying another word. All we can figure is that the men in her house are not real friendly all the time and that she's not supposed to be talking to us. We've heard some fights over there, and some very strange yelling. Guess we'll sit tight for now.

Saturday, September 5, 2009

Guitar Geek's Log 09-05-2009

As any wise male of 22 years would do, I dodged stress in my life as long as possible by putting off packing for my 2,300 mile trip and six month stay until the day I was to leave. So after getting up bright and early, and having a relaxing last day in Oregon, was finally ready to leave around 8:00 PM. Well Not quite though, I needed to go say goodbye to one more family. My girlfriend and best friend of three and some years and I had decided to go on a break the week before, and it was now time for that goodbye. Her family was there to see me off as well, so it stayed pretty light hearted. I was there for about an hour before finally shoving off for MI.

I admit that I started off on that trip already pretty tired, but I had enough coffee that I knew I'd be awake for quite some time. I made it to Spokane, WA before sleeping for a few hours. After that, it was one straight trip to My Uncle Greg and Aunt Kathy's place in Billings, MT. I had a baseball game and dinner that I was supposed to be there for, and I knew I was going to be close to that deadline. I was able to make it on time for the game and dinner, though I had gone all day with only eating beef jerky and sunflower seeds, so my stomach wasn't up for much dinner.

I had an awesome visit with the Aunt, Uncle and all my cousins! We went on a little hiking trip the next day up to a nearby waterfall, and then stopped for ice cream on the way back. Oregon ice cream, I might add! The next day with them, I went to their church and repeated my guitar quest story to a LOT of people who were trying to be very friendly. I played ultimate Frisbee for the first time at a church gathering in the park that evening, which was lots of running, but lots of fun too. I spent the next couple of days visiting, reading, and tending to random jobs around their house. A few drawer faces were in need of attention, and I also hung a couple doors for their new rooms of the house.

After all of John's bragging about Wyoming sunsets, This is the best the Always West had to offer me. Here is the Wyoming sky two hours before I got to Ben and Penny's place. Not bad, but I've seen many better in Oregon.


So after having lost more than half the gear oil from my transmission between home and Billings MT, I needed a new output shaft seal. Uncle Greg and I searched the local shops for a new seal, but the best options I had were to have one overnighted from none other than Portland, OR. Thirty bucks later, I had the new part and was able to leave Billings on the day I had planned for after all. When I stopped to capture this sunset, I was also checking how much fluid I seemed to be losing and the amount was very minimal.

I made it to Ben and Penny's fine and also had a good visit with them. Penny had to work every day that I was there, but Ben's schedule had him off every day I was there. So Ben and I got some work done around his place, did some pistol shooting, picked up a bunch of brass from the range for reloading, and even did some fishing. Ben and Penny play softball every week with their church team against other teams from the city. They talked me into playing for their team since they were a few people short, so I helped them out for two games. The league they play in is kinda funky where girls and guys both play, girls bat with their strong side, but guys are suppose to play with their weak hand. However, since I play a mean lefty and most guys were right handed and swinging lefty that night... I um.. Fit right in with my strong arm. Besides, I thought that was kinda sexist. Seems like some girls would have something to say about the handicap imposed on guys.


With as well as my plan worked before, saving my departures for nightfall, I did it again. I was supposed to be in MI by Sunday, and I left Ben and Penny's place about 10:00 PM Friday. I got another thermos full of coffee, a hundred mini boxes of nerds, 2 dozen airheads, and a Monster energy drink, a fill up on gasoline, and I was ready to go. I had about 20 hours of traveling ahead of me at that point. I drove all night, and after losing my muffler in Minnesota, decided to get some sleep at a rest stop. With my 9mm tucked neatly in my hoody pocket, I caught a refreshing 2 hours of sleep. That was the last time I slept before reaching my final destination.... Except for the couple of seconds while cruising down the interstate. Just kidding. Anyway, I reached Big Rapids at about 1:00 AM Sunday, and then slept in the car until an hour before I was to appear for orientation at Galloup School of Lutherie, at 12:00PM. I got one funny look while shaving in Mc Donald's bathroom, but it might have been that the employee just didn't like me showering with my supersize drink cup over the floor drain. I didn't ask, and he didn't look like he wanted to talk about it.


Orientation consisted of everyone introducing themselves, and the instructor telling us all of their little rules, and in short that we would be treated like children for the next six months. The entire Master's Program student body that was still there had this strange beard club going on, and I realized I'd have to do my best to fit in. So seven days now, I haven't shaved. We'll see where that one goes. So far, I look about like this.


We've had several demo/lectures that covered things I already knew and fully understood, but I've caught a few little tips that'll make things go faster. I had forgotten that our first guitar, which is my electric bass, is from a kit. We received out kits on the first day of class, and after a demo on how to make a nut, we began work on our own instruments. I've made lots of nuts for my own guitars, so the idea was nothing new, but they do use some different tools from what I had always used. Rather than going slow and easy on a sanding board, they pretty well go right to size by holding the nut blank to a stationary belt sander. I burned through my first nut blank because of this as it is much more difficult to sand evenly while trying to hold the tiny piece of bone to a speeding 80 grit belt. With that blank in the trash and a new blank in hand, I was finishing up a more successful nut.


Here is my successful half completed nut. The bottom of the nut slot on this bass neck is cut just like the surface of the neck at a 7.5" radius. This radius must first be cut on the bottom of the nut, and then with a 3/32" piece of Plexiglas, we trace another line for a starting point on the top of the nut. The Plexiglas forms to the neck radius and therefor transfers that radius to the top of the nut. With the nut fitting tightly in it's slot and flush on both ends, we glue the nut in place. As long as I don't biff now, that nut should stay there for years to come. String slots and string height will be cut and adjusted at a later point.

At this point, the neck must now be fit to the body. Both the necks and bodies are mass produced by All Parts Inc. and some variance exists from one to the next. We use a sanding stick (which is made from spruce brace stock cut to a comfortable length and faced with self adhesive sandpaper, 80 grit on one side, and 120 grit on the other side.) to remove material from the body neck pocket until the neck will fit in place with a "responsible" amount of clearance.


If you look closely, this neck fits in place with a 40Lb paper shim on all sides. The shims ensure that there will be enough space for the neck to fit in once lacquer has been built up on the neck and body. Nitro cellulose lacquer is prone to chipping so the neck cannot be forced into place at all once it is finished.

With the neck and body fit to each other, both pieces are ready to be finish sanded. Using a hard sanding block with 240 grit paper for all flat surfaces, and 240 grit by hand for all curved surfaces, we scribble pencil marks all over each piece to help the newbies know when they have sanded all parts. With each piece sanded, the instructor informed us we were not competent enough to spray a vinyl sealer coat and that he would be doing that for us.. along with the first three coats of clear lacquer. We finally got to do some spraying our selves eventually, building six coats of clear on the neck one day and then beginning with the sunburst finish on the bodies the next day.


Once a couple coats of clear are on the body, the majority of the faces are masked off so that the edges can be coated with solid black lacquer, beginning the sunburst process. Once the edges are coated fully, the masking will be pulled off, and we begin to spray the final edge of the black, or the "fade". In this picture, I have removed the


masking and I am mostly done with the final fade lines, but I still need to even them out a bit. Justin, my instructor, is busy mixing some more black lacquer right now. He sort of helped me mess up my fade lines so I wasn't entirely happy with the outcome. The important thing though is that I understand the process, and I do, so I'm trying to be okay with it all. I don't have pictures of the next couple stages, but right after this, the Honey Amber lacquer is sprayed on the entire body which only effects the center portion. Once that is done, we begin the building of clear lacquer on the body. Another six coats of clear are applied and on Tuesday, we will begin with our wet-sanding process.